
So I've been inspired by my planning for our trip to Key West in August for the Lobsterfest craft fair to do some beach themed crafts. This one is a Sea Creature Mask and is a lot of fun to make, whether you can do it at the beach or at home in a sand box.
What you need:
Beach stuff such as shells, sea glass, driftwood, etc
Plaster of Paris
Water bucket
String
What to do:
In a perfect world, you would do this project at the beach, picking a moist hard packed strip of sand just above the wet tidal sand. But if you are landlocked, just pour some sand at least 3-4 inches deep and 10 inches tall (an old cake pan works great for this), and wet it and pack it tight.
1) Dig an oval/face shaped hole into the sand that measures about 5-8 inches tall by 2 inches deep.
2) Arrange you beach findings to make a face. Remember to tell your kids that they are looking at the face in reverse, so to put the side they want showing face down into the sand.
3) Mix the Plaster of Paris in the water bucket based on the package instructions (if you are lucky enough to be at the beach, just use seawater). A standard box will make 3-6 masks, depending on their sizes. Usually a think creamy consistency works best. Too runny and the plaster will seep under your findings and cover them up, too thick and the plaster will dislodge messing up the mask.
4) Pour the plaster over your hand, held about an inch or two above the hole, to break it's fall and make sure your findings don't get disturbed. Make the plaster layer about an inch thick.
5) Tie a knot at both ends of your string. When the plaster begins to thicken, press the knots into each side of the mask to create a hanger.
6) Once the plaster begins to harden, but is not too firm, dig the sand away from the mask (rather than just pulling the mask out). Then use water to gently wash away any flaws as you will have a few moments to manipulate the plaster's surface before it hardens completely.
Hope you enjoy this as much as we did! Pictures will be posted soon.
Wednesday, June 2, 2010
Wednesday, April 28, 2010
Great Mother's Day Gift Ideas
As I just realize Mother's Day is just around the corner, and begin to scramble to figure out what to get my mother and mother-in-law, I realize I'm not the only one in this predicament. Of course, My first suggestion to my faithful ones out there would be to buy your mother something from Dayna Lane Gifts! :) However, I do like to branch out, and let you know of other artisians out there that we meet on on travels (ie local craft fairs that give us nothing better to do that chit chat with those around us). The most recent ones we met were a couple based out of Gainesville too. They have two separate companies, which works perfect for them since one could sell you a gift for a Mother of a human child, and the other a gift for a Mother of an "ine" child (as in feline, canine, etc).
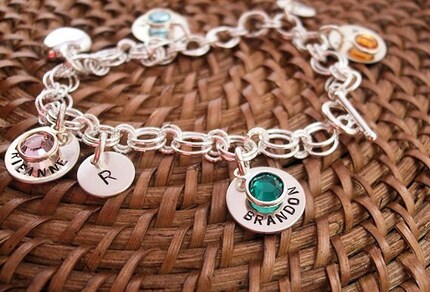 First is The Two Beans, (Amy) who makes these beautiful hand stamped pieces. She has all different shaped charms, and will stamp them with whatever saying or name you wish, and will even add Swarovski crystal accents (perfect to represent the kids birthdays, anniversarys, etc.)
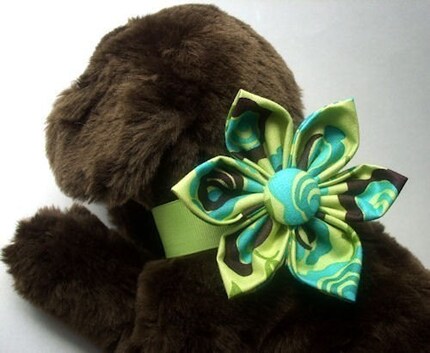 Next, is BowWow Couture (Anne) which makes handstiched collars for your pets. My favorite are the ones with the detachable flower. They had their little Min-pin/Chihuahua mix "Mouse" there rocking one of these, and we fell in love (of course, Mouse's personality may have contributed just a smidge).
So if you are too cramped for time to make something yourself this year (and I will be posting some ideas this week for that as well), check us all out. Remember, if you can't make it yourself, still try to keep it personal and handmade by using a local artisian or one found on Etsy. These one of a kind gifts are more heartfelt and unique than any garbage you'll find at a box store....I promise!
So if you are too cramped for time to make something yourself this year (and I will be posting some ideas this week for that as well), check us all out. Remember, if you can't make it yourself, still try to keep it personal and handmade by using a local artisian or one found on Etsy. These one of a kind gifts are more heartfelt and unique than any garbage you'll find at a box store....I promise!
Friday, April 23, 2010
Homemade Chia Pet
Ok, after being gone for a few weeks on a business trip with the hubby, I'm back and ready to give you some more great craft ideas. This one is in honor of Earth Day, and is a homemade chia pet (or as my son lovingly named his, "Robot Cup").
 What you need:
Plastic cup (hopefully recycled)
Cupful of dirt (go dig up some from the yard)
2 googly eyes
pom poms
pipe cleaner
feather, sequins, whatever you would like/have lying around to embellish)
grass seeds (or if you have a cat and REALLY want to make it happy, get catnip seeds)
What to do:
1) Glue on googly eyes, a pom pom for a nose, and the pipe cleaner for the mouth.
2) Decorate and embellish to you hearts content until your cup looks just like the Chia Pet you child always wanted. :)
3) Fill cup with dirt to almost 3/4 of the way.
4) Pour in a generous amount of grass seeds
5) Pat seeds down gently and then top off cup to almost full with remaining dirt
6) Water your Chia Pet cup, place in window and watch it grow!
*My son Connor loves going out to visit "Robot Cup" every morning to water him and talk to him, and give him haircuts. Just make sure if you go out of town for a bit, have someone water your cup, otherwise you'll get home and he'll look like he used a bottle of conditioner on his hair!
Thursday, April 1, 2010
Sock Bunny
Well, everyone I know loves sock monkeys (how can you not?), so we decided to post a really cute Easter version of a sock monkey...a sock bunny! It's an easy and fun no sewing involved craft you can do with your kids, and you can alter and make this your own however you want.
 So here's what you'll need:
-1 knee high kids sock (pink, white, blue, or whatever color you want your bunny to be)
-2 googly eyes
-2 rubber bands
-stuffing (polyfill, beans, cotton balls, whatever you'd like)
-white pom pom
-1 ft ribbon
-red and black marker
-glue
-scissors
And here's what you do:
1) Stuff sock with filling enough to create a body (about 3" tall) and then wrap 1 rubber band around until it is tied off.
2) Continue stuffing sock with filling to create a head (about 1 1/2" tall) and then wrap the other rubber band around until it is tied off as well.
3) Take the ribbon and tie it around the neck of the bunny into a bow.
4) Glue the white pom pom onto the back of the bunny's body for a tail
5) Glue the googly eyes onto the bunny's head.
6) Draw a mouth, nose and whiskers for the bunny's face
7) Take the remaining part of the sock and cut it in half until you are almost to the top rubber band to make the ears.
8) Add any other embellishments you'd like to make the bunny your own
9) Commence cuddling!
Thursday, March 25, 2010
Breast Cancer Awareness

Friday, February 5, 2010
Handmade Florida Valentines
So, since it is almost Valentine's Day, I've been searching for a cute idea to post for a handmade unique Valentine. Who would have thought I'd find in within the pages of my 2 year old's favorite magazine? These adorable Flamingo Valentines are right up my alley...especially with us being based out of Florida. So I had to share this with everyone out there. The idea comes from Michelle Reyzer and the photo is by Mark Godfrey (Feb 2010 edition of Your Big Backyard by National Wildlife Federation). Check them out, make them with your kids (or by yourself) as they are too cute to pass up!

What You Need:
-pink construction paper
-pink pipe cleaners
-pink feathers
-googly eyes
-scissors
-glue
-black marker (thin)
What You Do:
1. Cut out two matching heart shapes and one beak shape (a
rounded triangle) from the construction paper.
2. Bend one of the pipe cleaners into an "S" shape to make the
flamingo's neck. Glue the pipe cleaner to one heart. Glue
feathers to the same heart to make a tail.
3. Glue the other two pipe cleaners to the bottom of the heart.
Bend them to make legs.
4. Write a valentine message on the other heart.
5. Glue the second heart directly on top of the first heart
(valentine's message up!). This will cover the glued ends of
the pipe cleaners and feathers.
6. Color the tip of the beak black as shown. Glue on the googly
eye. Then glue the beak to the end of the neck. Fluff up the
pipe cleaner neck, and your Flamingo Valentine is ready to
present!
So Happy Valentine's Day to everyone from all of us at Dayna Lane Gifts!!!!
Subscribe to:
Posts (Atom)


